Powered By Blogger

INTRODUCTION:

Welcome to BobKat's Lair ®™

***

A lair is a home; A castle; A burrow; A haven; a place where one should feel safe. To ensure our safety especially in one's lair, we have laws. And some laws cause more harm than good!

This is a good place. There's lots to see and do. It's apolitical while providing non-partisan news about politics, which we can't escape.

Regarding compliance with EU standards, I use no cookies, tracking devices or programs or other personal devices that may be banned in other countries. I will note however that my blog is hosted by Google and I am not responsible for any of that.

My goal is here... to present topics which highlight the plight of people. Why, 2000 years after Caesar Augustus, are we still a people being hurt? With all our advancements in technology, medicine, communications, why are we a people still being hurt? Human nature hasn't changed much, but that doesn't mean it isn't time now for that to happen, and it is undoubtedly happening - hard to see however. This blog is part of that change and a witness to it.

***

My blog is dedicated to my family, friends, mentors, and all others whom I am grateful to, and love(d).

***

Please view my Blog using the latest version of your browser. Some features may not be active if Java or Flash is disabled or not installed, or your browser is not compatible with Google Blog.

***

NOTE: Nothing included in my Blog is intended to advocate behavior illicit in nature, or in violation of man-made laws where harm to a living person, animal or the environment is involved. Person's under 17 probably shouldn't be here, though there is far worse out there. Just saying.


***

NOTE: Adding a comment to my Posts is easy and also encouraged, no matter what your point of view is.

Here's How:

If no comments have been posted you simply click on "No Comments" which is high-lighted. If comment(s) have been left it will indicate how many, click on that link. Enter comment.

Please do not include links to other websites or blogs in your comments without prior approval from the site administrator, me. The comment will be deleted.

Thank-you!

Bobkat's Lair ©®™ 2009-2023

Please Note: This Blog, with the Trademark "BobKat's Lair"
is legally registered and under US law cannot be used without my express permission. In addition, all material produced by within this blog-site is copyrighted and cannot be reproduced without my express permission. It may be used for your own purposes as long as there are no monetary gains of which I am not notified and not entitled to benefits. You are welcome to post links of my content, with the disclosure that this material is trademarked and copyrighted by "BobKat's Lair".

*****

Petitions by Change.org| Start a Petition »


*****

May 30, 2014

GET OFF THE MERRY-GO-ROUND AND SEE THE WORLD TOPLESS

IT was inevitable... As inevitable as was the legalization of cannabis. Recently the US House voted in favor of a bill with an amendment added to not fund federal raids on marijuana in states where cannabis is legal for medical use. It now moves to the US Senate... the former Republican majority, the latter a  Democrat majority. To me, that is great news!

Some people disagree. Some people will always disagree.

They argue principles, morality, decency, public good.

I argue, "Live and Let Live; Stop the Hurt; Stop the Shame; Stop Arresting people for:

Being female and taking their tops off!

And marijuana use too, but this is about Women's Rights, and exposing their nipples.

I'm not joking...

We see signs in stores before we enter, "Shirt and Shoes Required". Hey, women don't have to think abut it at all... for men I'll wager that 30 - 40% of establishments with that requirement look the other way for men.

One way I know this is that while living in Boston and going out for a night to a special place - a penthouse club where proper attire was required, both my girlfriend and I wore jeans - not allowed, yet they let her in, no problem, me, they told me I wasn't properly dressed, to leave. When I argued there were women wearing jeans a police officer stepped forwards and asked, "Is There A Problem?"

Ahh, but why did I not simply accept rules of etiquette? We have a double-standard and we should not question it.

The question is: Are Men and Women Equal?

The answer should be yes, and why? We're all, of any race, any tribe, any family, all human beings. Life is difficult and it's the goal of human beings to find peace, love and prosperity.

Having made my argument, you may think I'm delusional... if so, seems we are at worlds-end as gay Marriage is legal now in most states as well as on a federal level, marijuana is gaining wide acceptance and the Reefer madness era seems to have sunk, with no black-box to emit pings that can't be traced anyways. By 20/20 I predict marijuana will be legal in 2/3rds of the states. The Schedule One mentality, the stepping-stone ideology, all sunk. None were ever real to begin with, that's what is so tragic. But that's in my following post, back to equal rights.

There's a movement on, in case you hadn't noticed, to give women the right to dress the same as men and that means topless.

FOXNEWS: "Brits Olivia Edginton, 20, Lydia Buckler, 21, and Norwegian Ingvild Marstein Olsen, 20., are encouraging people around the world to strip to the waist with their Topless Tour project, reports the U.K.'s Orange News."

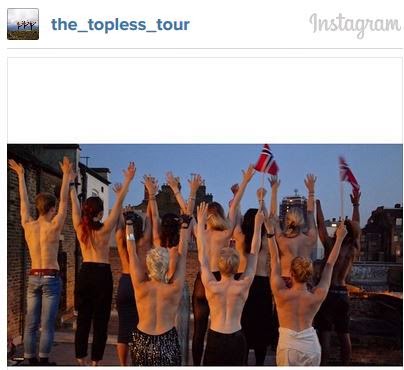
http://www.foxnews.com/travel/2014/05/27/top-tour-movement-takes-off/?intcmp=features
This may seem insane or immoral, to me it doesn't.

Scout Willis, the 22 year old daughter of Bruce Willis and Demi Moore, recently bared sans shirt in NYC, where apparently it's legal - I did not know that! But then I'm a guy and I don't have to wear a shirt, though I CHOOSE to.

"Well, that's one way to make a statement."  Scout Willis might be saying...

"Scout Willis walked down the streets of New York City Tuesday wearing nothing but a skirt and flats to protest Instagram's policy against female nudity...in a big way."

The link will bring you to the censored pics of Scout Willis.

Canbio.com/Scout Willis Link: http://www.cambio.com/2014/05/28/scout-willis-struts-around-nyc-topless-to-protest-instagram/?cps=gravity


Accepting new ways of thinking I understand it's difficult. However I don't see the world in black and white. I see shades of gray and rainbows.

Happy 21ST Century... One Hundred years ago the beginning of WWI began... not for US... but it began.

May 16, 2014

REBUILDING THE ENGINE IN A 2004 SUBARU OUTBACK - TECHNICIAN'S GUIDE - Conclusion

SUCCESS!!!

No ambitious undertaking is without a conclusion, it just took me awhile. If the average person is still with me that's good, but surprising. If an educated technician is still following me that's also good and unusual. Why do I say that? Because how often does the average person replace the head-gasket(s), timing-belt, water pump, clutch O2 Sensors, and drive-shafts? I would think rarely.

However, giving benefit to doubt I'll assume this series of posts will assist someone. For that reason the primary goal of this post is not simply to draw a conclusion, but to also provide post-op experiences and observations, maybe helpful tips.

I completed my first week commuting to work since the engine work was completed. I've put a thousand miles on the car.

It's running very well, VERY WELL...  though at first it was disconcerting - just a little. The idle after warming up would drop near where the car would stall. I Googled it and there was one suggestion to be patient and wait for the ECU to catch up. That advice worked. The idle stabilized.

My P0420 - "catalist below efficiency" code warning has still been popping up at random - since it takes two full cycles for the ECU to determine that and since it occured at one point around 75 miles, I must assume I'm borderline as I've got 360 miles so far without another trip. Yes, I'm trying to remedy a P0420 malfunction code, one of the worst codes to remedy.

The reason being there are so many causes...

Okay, the car is running very well. It took time for the idle to adjust. I did make sure the intake manifold bolts were snug. Any oxygen leaking in would cause a P0420.

The head-gaskets weren't as difficult as i imagined, given I had an engine stand. Getting the engine out of the car did require two of us. There was a serious issue separating the engine from the transmission bell-housing. A gasket scraper solved that, though it's not in any manuals. Used "anti-seize" when I reconnected it.

Both my front drive-shafts had broke boots at the transmission side...  One broke apart during trying to raise the transmission a certain amount, compared to the height of the engine as we were pulling it out. It's a very difficult on the spot kind of calculation. Care need be taken, as the transmission does need to be raised to assist in refitting the engine and transmission.

Timing belt replacement was fairly easy, except, there's a catch. The manual call for using a compression gauge to determine when the #1 cylinder is in the compression stroke and the pointer is Top Dead center. I used a wooden dowel... still not easy but it worked. I then marked with a white permanent marker three sets of location points to where both camshafts were aligned ans well as the timing gear. I'm glad I did; as soon as I removed the old timing belt the cams slipped... to be expected as the valves were under torque; the movement wasn't much, but from 20 degrees to 40, depending on which cam. I had everything mark for original alignment so I wasn't concerned.  It was mearly a hassle that took several tries to get the two cams and the crank to realign as was required.

My final challenge was oddly installing new seals. I did both the front and rear engine seal. I had two of each and in the process ruined the first of each. I've installed many seals, and yes you grease them first, but these just didn't want to fit - wrong size ? - no, by appearance replacement identical to the original.

I have one more drive-shaft to replace, a little body work, decided to replace the water temp sensor - on order at only $10.

The car runs like new with no valve tapping noises, and it's possible, like the idle, the catalytic converter will rebound - aferall, the previous owner paid to have it replaced 6 months before I bought the car.

That's pretty much it... a vacation unlike any other... and success. People are by nature builders. What better week off is there than rebuilding an engine?

AFTER-THOUGHTS (May 19, 2014):

1) I forgot to mention that I had to change the head gaskets as they were old, and leaking - the Outback models between 1998 - 2004 had a problem with leaking head-gaskets. Fortunately, the anti-freeze didn't leak into the oil or pistons. Stop leak would "fix" the leak for awhile, but one can't depend upon it.

2) Finding the correct parts for these cars can be very frustrating. I'm not exactly sure why. Part of the issue is that auto-part retailers often mix Legacy with Outback. You'll find yourself looking at a part for a Legacy Outback, a Legacy, an Outback. In addition are the different emission's  standards, Federal and California. The latter is more stringent. The parts are different. Some will tell you that only applies to exhaust and sensor parts. 10% of everything I ordered was the wrong part... there were even correct parts mixed in with wrong parts.

3) I had a particularly difficult time installing the front and rear engine seals. I compared the new part to the old before installation, and in both cases they matched. I greased them lightly to aid with installation. I should have been particularly attentive to the rear seal - it's a big seal.

When you don't do this kind of work everyday, I have to say it's easy to get distracted by what you have to do next. When I had trouble with both the front and rear seals I should have sat back and relaxed, looked to see what others had to say, by using Google Search; like how I did when I realized I had no idea how an angle torque tool worked.

4) If you've ever worked on cars but haven't done so in awhile, it can be challenging. All told I probably spend between $1500 - $2000 for the repairs.Considering the car has almost 220,000 miles on it and I use it to commute 150 miles/day, I'd say that it was worth the money.The car runs great.

UPDATE - May 27, 9:09 PM:

Myself, sometimes I don't read blogs or news until years later. So for all of you who have visited just once, you might visit again.

And I've got a little bad news. It would appear the rear main seal I replaced is leaking oil. At least a quart a week. The car is running really well, especially once I got the correct spark-plug wires and installed them this past weekend. Along with the left front drive-shaft. It was a bear. The outer spine was sealed to the shaft. I had to sledge it to get it out. Not good, not fun.

To get back to the rear main seal, the one that was in there was in good shape, but a good mechanic will most often replace these seals especially when a car goes over 200,000 miles. That rather contradicts what these guys say on a Subaru-type forum:

"I would keep in mind that myself, GD, and Davebugs have no idea how many Subaru engines we've pulled, replaced, and swapped, easily 3 digits worth between all of us combined. We are suggesting this for very specific reasons, not just bantering.

there's a high percentage of repeat failures (i haven't had one yet but i quit replacing them years ago), and the failures i'm aware of are from very highly skilled people who have done custom subaru motors swaps, used subaru parts, etc. not just your average guy tackling his first clutch job.

this also coming from guys - that always replace all seals we can get to - like crank, cams, oil pump, whenever we do a timing belt job. but the rear main is kind of a different beast, i've always wondered why?" 

Live and learn...

UPDATE - June 01

The rear main seal was leaking badly. I pulled the engine again this past weekend. The seal was leaking at the base of the seat. Defective? Other than that it looked like it was seated properly. I bought a Felpro replacement rear main engine seal for twice as much. It took fully two hours learning the trick to getting it seated it was of such precise diameter it kept wanted to go askew as you tried to seat it. I finally got it. I can tl you during the process don't try to use silcone sealant to ensure a lasting fit. It's so precisely sized there's no room for the silicone - it'll just make a mess with the grease you apply to the inner lip. If there's a  tool specially designed for this job no forum or tech site has suggested it. It's a trying couple of hours unless you do it all the time.

Just to make certain the seal was sealed, rather than use silicone, I used a gasket maker that was orange in color, that dries hard and seals. I applied the first coat Saturday night. So it looked like this:


The following day I put a smooth finish coat over the base gasket. I stayed away from the inner lip. The gasket was to secure the outer seat. Click the images to see full size then click your back button to return.

This is a job one doesn't want to repeat.

A plus was getting to regrease the throw-out bearing inner slide... previously it had rained the night before and any grease I had applied for reassembly that last day had become contaminated, and I'd been too occupied with reassembly. That caused the clutch to stick and be uneven when stepping on it. Regreasing the slide did the trick, so a lot of hard work for a weekend, but worth it today. Too bad Subaru hadn't added a narrow ridge to seat the seal into - would have made the job a lot easier.

The great news I'm driving it still and it feels better than ever.

May 08, 2014

REBUILDING THE ENGINE IN A 2004 SUBARU OUTBACK - TECHNICIAN'S GUIDE - Part Two

Well it's done; the engine rebuild. I didn't mess with the pistons, they were fine from what I saw. Yesterday I worked from 10 AM to 7 PM.

I began by uncovering the timing belt. Sorry no new pictures, to busy working;  but seen here in the following picture you need to remove the harmonic balancer, #1 here. Ah, there's a bit more involved; the harmonic has the timing grove on it. You need to rotate the engine clock-wise until the grove lines up with top-dead-center.There are two engine rotations for T-D-C. One rotation would put cylinder #1 at low exhaust. That is not what you want. The #1 cylinder has to be at the max compression stroke, that's the other rotation. 180 degrees apart. The book suggests a cylinder pressure gauge. I don't have one. So I rely on an older trick. I find a dowel, and seat it into cylinder #1. I mark the dowel, rotate the engine to T-D-C. When the dowel is farthest out, that's the max compression. Leave the harminic pointed at T-D-C on the gauge in place on the plastic cover.


You've done that - or I have. I use a permanent white marker to document points of alignment. White dots everywhere. An excellent decision. Now, using an electric impact gun, and an old belt to stabilize the harmonic, I run the impact gun counter-clockwise on the bolt in the center to loosen it.

I then remove the many bolts holding the plastic cover in place, and moving a few odds and ends out of the way.

I find replacing bolts loosely in places the aren't in the way, and using separate cans for bolts I remove make things easier.

I recommend having a stool like a milk-crate to sit on, and a table for your tools.

With the plastic cover removed the timing belt, water-pump and many bearings and gear are revealed. Again, using a white permanent marker I make alignment marks, at least two. I do this to the crankshaft gear (that was connected to the harmonic balancer) to denote T-D-C, as well as the two opposite camshaft gears, marking their locations prior to removing the timing belt. Failure to do this will create a mess. The timing belt comes off easy, but then the camshafts relax a half to a full inch. To be able to install the new belt everything must line up. But that comes last.

Subaru's have a interference engine. Simply put it's different with a head on each side, rather than one on top, and if the timing belt breaks it doesn't destroy the engine.

Removing the first head, closest to the 1 in the image above wasn't real difficult. Loosening the 6 head-bolts was the challenge. Then I partially unbolted the intake manifold, and removed the head. The book says you must remove the camshaft and lifters also - a major pain in the ass. I saw no need to do that as the head-bolts are right there, and it worked out well.

With the head removed I could examine and admire it. I wasn't going to have the heads resurfaced - which is recommended, rather I carefully used a sharp and stiff scrapper to try and get as much remaining gasket free, using very fine steel wool in a few places. The less the better.

The gasket(s) that came off were ruined, and I could tell it wasn't from removing them. Fortunately there was no indication of anti-freeze in the pistons, which you can see with the head removed. The replacement head-gaskets I bought are Fel-Pro Perma-Torque. They are two steel sheets with a special surface. The old gasket was a single sheet of steel with a gasket type finish and that is what had failed.

Finally able to insert new gaskets for both the head and the head-intake manifold, and it's down to torquing 6 new bolts. Now the torquing sequence is new. I'm old school where you torque to a specific ft-pounds in a special pattern. But this Subaru, you use a torque wrench to tighten to an initial torque, then back off 180 degrees, then another 180 degrees, the torque two center bolts to this minor level, and the other 4 to half that. The use a angle torque tool (something completely new to me) to continue torquing first 80 - 90 degrees, then finish with an additional 80 - 90 degrees.

Wow, hope the first head I worked on is okay... it was a learning experience. I did much better with the other head.

Oil pan gasket now replaced also... and thanks to my fore-thought the timing belt is back on and if not for those position dots, the timing belt would have been a major head-ache. New water-pump installed, cover back on, harmonic reconnected - torqued using the impact gun in clock-wise. Ready to swap between engine stand to engine hoist, install new clutch, and reattach engine to transmission.

Oh yeah, and replace the drive-shaft.

May 06, 2014

REBUILDING THE ENGINE IN A 2004 SUBARU OUTBACK - A TECHNICIAN'S GUIDE - Part One

A neighbor gave me the car for next to nothing. It had 212,000 miles on it. It needed engine work. He bought one just like it, same year with half the mileage... guess he likes the car - I know I sure do and I drove it 150 a day to work for a month before this week.

The car has next to no rust and is in fine shape other than the routine work needing to be done. The list is pretty long.

Replace both head-gaskets; replace the timing belt, the water-pump, and oil pump seals. Replace the clutch, maybe the front drive shafts - one on hand - one confirmed bad.

A brief history about me. My father was a Navy mechanic... used to work on the Corsair fighter planes. After I was born he wanted to open his own auto garage. It fell through. Money.

Somehow, instead he became a sales-manager for big industry. But being mechanical was in my blood... beginning around age 19 I began to do all my own car work. That was around 1973.

The repairs seem much more frequent back then, Cars today seem more reliable than back then.

Around 1984 I got an apprentice job working for Volvo as a mechanic. We were called technicians. I stayed there for awhile until I finished what I needed and moved on, to a specialty Saab/Volvo repair shop. I loved those cars back then, owned several Saab 99's, over those years. But they had problems and so did the shop. After about a year and a half I got laid off... for a couple months until I met the boss from the Volvo place and he said he was now the service manager at a dealership, and if I wanted a job I had one. I took it.

The goal is to assure you I know cars. I've been working on them for over 40 years.

Thus the prospect of pulling the engine out of my new 2004 Subaru Outback was simply a challenge. Like a - it's been 30 years maybe since I've done something of this complexity, Am I serious or insane???

Too late... half the jobs finished. I took the week off to pull the engine and replace the stuff it needs. Fortunately I had a garage to work in as the temps were in the 50's and none too supportive. Sunday and Monday was a matter of draining the radiator - a plastic bleed screw on the bottom right of the radiator. Both radiator hose clamps were rusted beyond reuse; the upper I simply wrenched until it fell apart. The bottom hose was worse... I had to cut that one. I''ll deal with replacing them later.

I have to say all the wiring is very straight forward, color and shape coded, so about the worst that might happen is forgetting to plug something back in. Intuitive type car to work on; but that's not to say it's for beginners.  This is what's called an interference engine by Subaru:


It's my engine on an engine stand in the garage. It was no small feat getting it to that pristine location.

What they don't tell you in the manuals or online:

1) The only thing holding the engine down are two engine mounts - they are generally easy to remove found outwards on either side of the underside of the vehicle. There is nothing holding the engine down directly center underneath. The rest of what's holding the engine connected to the trans-axle are 4 threaded studs, and I believe 4 bolts.


At the moment of the photo it was resting lightly on a stack of heavy cardboard, with a slight life by the hoist. At this point the clutch has to come off. And easy job with an electric impact gun.. From here it's time to mount to the engine stand.

I was certainly confused by how an engine stand worked, until today. They are sturdy stands with 4 swivels that both allow you to attach 4 bolts to the bell-housing (shown above) as well as have them firmly fixed to the stand - and this is accomplished as the mounts are able to swivel and slide.

But...

2) I neglected the most important part. The how of how it got to be so beautiful on that engine stand.

The idea is to disconnect anything attached to the engine. That's a lot of work. Then you need to disconnect the air conditioning and power steering pump. Disconnect the exhaust manifolds and remove all the nuts and bolts holding the engine to the bell-housing and transmission.

Now attach the engine hoist, and - forgot, only because I found out about this later - a You-Tube Vidio on problems separating the engine. Maybe it will help others, it got me motivated at least:

https://www.youtube.com/watch?v=hp7JtBfv8QU

The problem was this, despite every effort the engine would not part from the bell-housing. A friend showed up just then; a burly friend, a carpenter. He was happy to help, and like a true Viking he made that engine rock as I raised and lowered it. Not a crack emerged from all the rocking and shaking! Well, except he suddenly said there might be a crack here, on the right side... go get the metal 1" gasket scrapper. I reminded him prying at the seam was discouraged. He was like do you have a better idea?

I got the scraper, and he proceeded to hammer away on one side then move to the other side, until the gap was wide enough for a bigger wedge, and the engine finally detached.


In the photo above I'm showing where my friend first had to wedge the gasket scrapper ....

So all is good, right? Well it seems the manual doesn't say anything about moving the vehicle out of the garage to park it while doing repairs on the engine. Upon backing the car up - pushing the car out of the garage (I had left it in neutral, which was smart), the transmission rotated enough that the inner bearings fell out of the right-hand drive shaft:


The boot had split already and fortunately I had already bought a replacement drive shaft, planning ahead; just didn't think I'd have to replace it this week! I do now.


The picture above is the transmission/bell-housing, still in the car. That's the throw-out bearing and clutch arm in the center that will need replacing.

Now comes the fun part... rebuilding the engine.